So I've stumbled upon ivy Generator, a standalone application allowing you to grow realistic ivy on any object file. It is free for everyone, and you can find it right here. It Allows you to quickly and easily add that extra touch of realism to your scenes. The result you get with only a tiny bit of effort, is already quite impressive.
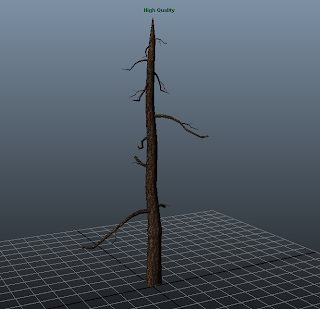
What you need to start, is just your model! For this, I've modeled a dead pine tree, for the ivy to grow onto, did the UV layout, put on some bark, a bumpmap etc ... I'm not bothering with tons of detail on this tree, as it won't be that upfront in my scene, and the ivy will cover most of it.
Exporting this to .OBJ gives an issue when importing in Ivy generator. The reason is that Ivy generator can only work with triangles. So Make sure you triangulate your mesh before exporting, and all will be dandy.
Once inside ivy generator, press the import button and select your .obj file. This will show your object in the preview window:
Generating Ivy is a 2 step process, first it grows, then you give birth to it. Growing will decide where the vines go, The Birth will use this info to actually generate the Ivy.
First, here's the most important of the growing settings:
Ivy Size: This is all about scale. It affects the way it grows, how easy it will get how high etc ... This setting, however, has no impact on vine thickness of leaf size. Depending on the unit setting in maya, or the scale you built your object on, you will have to change this settings untill you get a growth that feels natural in size.
Adhesion Weight: This setting determines how much the ivy will want to stick to a surface.
Branching Probability: all about how "knotted" your endresult will appear. If its growing to chaotic and wild, use this to simplify the branching of your ivy.
Maximum Float Length: this controls how far your branches can float through the air looking for other surfaces before stopping.
To get started, Simply doubleclick on the point where you want the ivy to sprout from, and you'll get a green dot. Then press the grow button and watch the creeping miracle of life! Click the grow button to stop the growth when you're happy with what you've got.
Now on to giving birth to your baby! Try a few times with different leaf sizes and branch thicknesses, to make sure the scale corresponds with your scene. We don't wont to end up with leaves the size of a small car. Unless you are ofcourse...
Getting everything right in Ivy Generator is crucial for a convincing ivy plant on your object. Once you are happy, export the object. This will result in an .obj file and a .mtl file containing the material.
Now the Obj file exported works perfectly well, the mtl however, has an issue when importing into Maya. It took me a while to pinpoint the cause of this, but here's what I found:
Open the .mtl file in your favorite text editor, This is what you'll see:
newmtl leaf_adult
map_Kd efeu1.png
newmtl leaf_young
map_Kd efeu0.png
newmtl branch
map_Kd efeu_branch.png
Simply edit the file and save it so it looks like this:
newmtl leaf_adult
Ns 1
map_Kd efeu1.png
newmtl leaf_young
Ns 1
map_Kd efeu0.png
newmtl branch
Ns 1
map_Kd efeu_branch.png
Now, from the textures folder of your ivy generator install, copy the textures into your sourceimages folder of your maya project.
when you import the object again, you can see the mtl actually gets loaded. Yet the white parts are not left out, and the shader settings are not right at all.
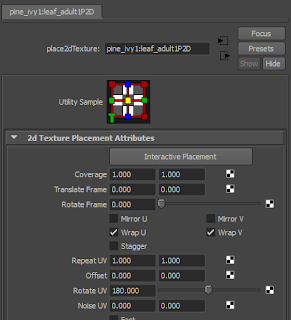
First of all, the leaves in my case, all seem to be upside down. Go into your hypershade window, show the graph for the leaf material, and select the first node in the row, and rotate UV 180 degrees.
Do the same for the young leaves node.
Next up is the transparency. The texture files included in ivy generator are PNG's with the white area supposed to be transparent. Right now they are not, simply middle mouse click and drag from the texture file to the shader, and select transparency.
So between the middle node and the shader node you should have 2 connections:
outcolor -> color
outTransparency -> Transparency
I thought the leaves were looking way to plastic-ish, so I edited the default shader settings to a much smoother highlight, less reflectivity, to getthe feeling these plants do need watering. If this is going to be up close in your scene, I do recommend going much further in getting the material to look and feel like real leaves. You can also download the texture pack on Ivy Generator's website, that includes the normal maps, bump maps, etc ...
dinsdag 28 december 2010
dinsdag 7 december 2010
Here we go
Hello,
Allow me to start by introducing myself, and telling you a bit about my background. My name is Bram Borremans, currently 26 years old, and a geek in many different ways. Here's my history.
Growing up as a gamer, I've always had an intrest for 3d environments, and the technology behind it. So around my 15th started leveldesigning for Half-life, and went on from there, into 3d max, and more recently into Maya. I never took any classes, and learned the little knowledge I have now thanks to the wonderfull world of the internet, until recently that is. I started a 5 month Maya course earlier this year, because I wanted to know more then just 3ds max, and a course was the perfect way to keep me motivated throughout the learning curve.
On this blog you'll find mostly work in progress, and lots of text explaining the difficulties I encountered. Maybe I'll even do some tutorials for the stuff I had a hard time learning, and couldn't find a decent tutorial about. This won't be a strictly maya blog, but Chances are in some cases I'll diverge into 3ds max, Z-brush, Photoshop, Hammer, UnrealEd, and who knows what else.
As a sidenote, a few years ago I also started drawing in evening classes at the local art academy, so you might see some old fashioned pencil and paper work appear here too.
Anyhow, back to the now!
Currently, as part of the course I'm in, this is my assignment
Requirements:
-Outdoor Scene
-Contains Central structure (Building whatever)
-Some foilage and other outdoor decoration
So, as a any decent first step, I made up my mind on what to make. As this would be a learning experience, I wanted to give myself a challenge. I chose a Victorian house, and started collecting reference. Out of this reference I distilled the most typical victorian features and started sketching up my own creation.
This design would be the bases of my scene. So started the modeling, and this is how my basic model looks like now:
As you can see, I ended up with a single object model of about 40k tris. I opted to create one smooth object as to make sure I got used to Maya's polygon tools, so I chose the hard route to get lots of practice sewing and welding (Or merging as Maya calls it).
Time to move on to the UV layout:
This took me a tremendous amount of time. I basicly just applied the automatic mapping, moved everything to the top left quadrant, and started sewing and stiching, moving complete parts to the top right quadrant. Most of this work was done on my Mac, that seems to have some performance issues with this. Selecting and moving UV's way a painstakingly slow process. Without a doubt, the most boring part I encountered so far.
After that, I mocked up a placeholder texture, gradualy detailing more and more, creating bumpmaps for the roof, wood, etc ...
There is simply no way I could create a decent Bumpmap for the stone slate roof tiles based on the color map. It kept turning out as a brick bumpmap instead of the gradient ramps I would require. Putting this on hold for now. Might try and do it with normal maps later on.
My texture dimensions are at 8192x8192 pixels, rather large and memory intensive to work on. I baked my ambient occlusion map last weekend, and this took well over 4 hours at 256 samples.
Yet this made a huge difference when placing it on top of my color map, and rendering out the results.
Other then that, the terrain shape has been created, some minor foilage (low poly background stuff), render settings, skydome etc have been created, only requiring some minor tweaking here and there.
Left to do:
-Figure out a way how to realistically create grass
-Fix Roof bumps (normal maps)
-Fiddle with material for pillars to also overlay the ambient occlusion.
-Finish up Texture
-Finish up Bump maps
-Create high poly tree for foreground (current ones are placeholders)
Future posts will probably be more detailed, this post feels like a quick recap of the last 2 months.
Here's a very basic WIP render, half-done textures, whatnot. Mainly to give you an idea of the Scene's setup.
Abonneren op:
Reacties (Atom)


